Can we create a RESTful JSON web service in DataFlex?
So there I was, sitting in a meeting with the customer and two tekkies from a third-party software house, when the question ‘Creating RESTful JSON Web Services in DataFlex’ arose. Our customer needed to provide an interface for the software house to access the customer’s system – a highly successful vertical market application written in DataFlex – which was the reason we were all there. One of those two tekkies had just explained that they needed a JSON-based RESTful web service to interface with… at which point the customer looked at me: “Can we do that?“.
I’d written a fair bit of DataFlex software to consume RESTful JSON services, so was familiar with the concepts, but written one? No… not yet anyway!
To buy myself a little time, I explained to the customer what a RESTful web service was:
Basically, in its ideal form, a RESTful web service uses a unique URI to identify each resource, so you might have a URL – or endpoint – for dealing with orders of the form “service-name” slash “order” slash “order number”. Then operations on those resources are defined by the HTTP verb used, so to create an order you would use POST or PUT; to amend it you would use PATCH; to retrieve it you would use GET and to delete it you would use DELETE. Most commonly the data interchange format used is JSON.
“But can we do it?” the customer asked again, just a touch of impatience starting to creep in.
Well, I am an overconfident idiot and always like a new challenge… in addition to which I’d recently discussed that kind of thing with Harm Wibier of Data Access EU – on the bus back from the “Surprise Evening” at Scanduc 2016 in November, in fact (see: that’s the real reason we go to these conferences!) – and I also knew we now had, thanks once again to Harm, native JSON objects in the DataFlex 19.0 product… so I said: “Yes, I think we can probably manage that“.
I didn’t pay too much attention to the discussion going on between the customer and the other guys for the next few minutes, as I frantically dashed off an email to Harm saying, essentially, “How the heck do I do that???” (“heck” might not have been been the exact word I used) … and by the time I returned to my hotel room after dinner that night, Harm had got back to me with a solution. A useful guy to know, is our Harm! To quote Howard Wolowitz from The Big Bang Theory: When they perfect human cloning, I’m gonna order twelve of those!
The next day in the customer’s office I had the basics of the interface up and running before lunch. Later there was a bit of a glitch having to do with the need to null-terminate our JSON responses, but Harm solved that one as well.
If you have read this far, you are probably interested in how to do that, so here we go…
Preparing the DataFlex environment
To start with, we are going to use DataFlex 2017 (download from here). It needs to be at least 19.0, because that is the version which introduced the JSON objects we are going to be using. If you don’t already have it, download and install it now.
Running the DataFlex Studio
First we are going to create a DataFlex workspace and web application, so we need to run the DataFlex Studio – as Administrator (right-click the shortcut and select “Run as administrator”), because we need those rights to create a new web application in IIS (Internet Information Services – Microsoft’s web server) – and answer “Yes” when asked if we want to allow it to make changes.
Creating the workspace
Once in the Studio, we need to create a new workspace (click the New Workspace link in the left-hand pane and the Wizard will walk you through the process), probably named for the kind of thing our new service is going to provide. I am going to use a very simple service as an example which I will call “Contacts”. In this case I am going to use the embedded database for simplicity, so we will not need to configure a database connection.
Defining a Database
When the Workspace Dashboard appears, we will click Create a table in the Database section; select the Embedded tab and give it the name “Contacts”, then click OK. Then we will define columns, almost all type ASCII: EMail (which, again for simplicity, we are going to use as our primary key), Name, Address, City, Postcode, TelHome, TelMobile, TelWork and Birthday (this last of type Date) and give them sensible sizes (note: Address will be longer, as will EMail; the Postcode and the telephone columns will be relatively short). We scroll down and create two indexes, the first on EMail (check Ignore Case) and the second on Name (check Ignore Case) and Recnum. Then we click the Save icon to create the table.
Creating a Project
Next we need to return to the Workspace Dashboard tab and in the Projects section, click Create a project, selecting Desktop Web Project from the dialog, then just accepting the defaults by clicking OK in the next one. There will be a wait while the Studio copies the Framework’s JavaScript and CSS files into our workspace (not knowing we are not actually going to use them).
Creating a RESTful web service object
Now we need to create our RESTful web service object. Select File → New from the menu, and in the Create New… dialog, select the Web Object tab, selecting Web Service Object there and click OK. Enter “oContacts.wo” as the name and click OK. You will be presented with a template web service… but we are going to change almost all of that!
Using the cRESTfulService Class
To encapsulate some of the complexities of delivering a RESTful web service I have written a class: cRESTfulService which is included in the sample zip. It essentially provides a framework into which you can place your business methods (full documentation of the class is available here). Copy it into your workspace’s AppSrc directory and “Use” it in your web object, making it the class your object is based on and also delete all the generated psDocumentation stuff, so that your web object source should now look like:
Use cRESTfulService.pkg
Object oContacts is a cRESTfulService
End_Object
Now, before we start adding functionality to our service (in essence, adding functions to our oContacts web object), we need to address some issues.
The Issues
- Our service will need to be able to receive JSON in the HTTP body of POST, PUT and PATCH requests
- We need to present the functionality of our service in a way that conforms to how RESTful services are supposed to look
- We need to be able to process all of the HTTP verbs we will need for a restful service, not just the usual GET and POST
Accessing the HTTP Body content
Currently in a DataFlex web service there is no way to get at the HTTP body (believe me, I have tried!).
So we are going to have to fall back on an older technology: ASP.
Yes, yes, I know! ASP is outdated. Nobody uses ASP any more! But for now we need it, and I promise it will only be a teeny-weeny bit of ASP. Nobody but you needs to know it is there. After a while you’ll forget it is and just be happy.
So here it is:
<%
Dim sData, iLen
iLen = Request.TotalBytes
If (iLen > 0) Then sData = oMyService.UTF8ToString(Request.BinaryRead(iLen))
Response.BinaryWrite oMyService.StringToUTF8 (oMyService.call(“GET_ProcessCall”, sData, iLen))
%>
See? It’s only four lines. You’ll hardly notice!
Put this ASP in a file – I name mine REST.asp – in the AppHTML directory of your workspace. It will pass the HTTP request, with the body (if there is one) content to the function ProcessCall which is defined in the class cRESTfulService.
Important!
Everywhere in that ASP that you see oMyService you will need to replace it with the name of your web object – in our sample case: oContacts.
Looking RESTful
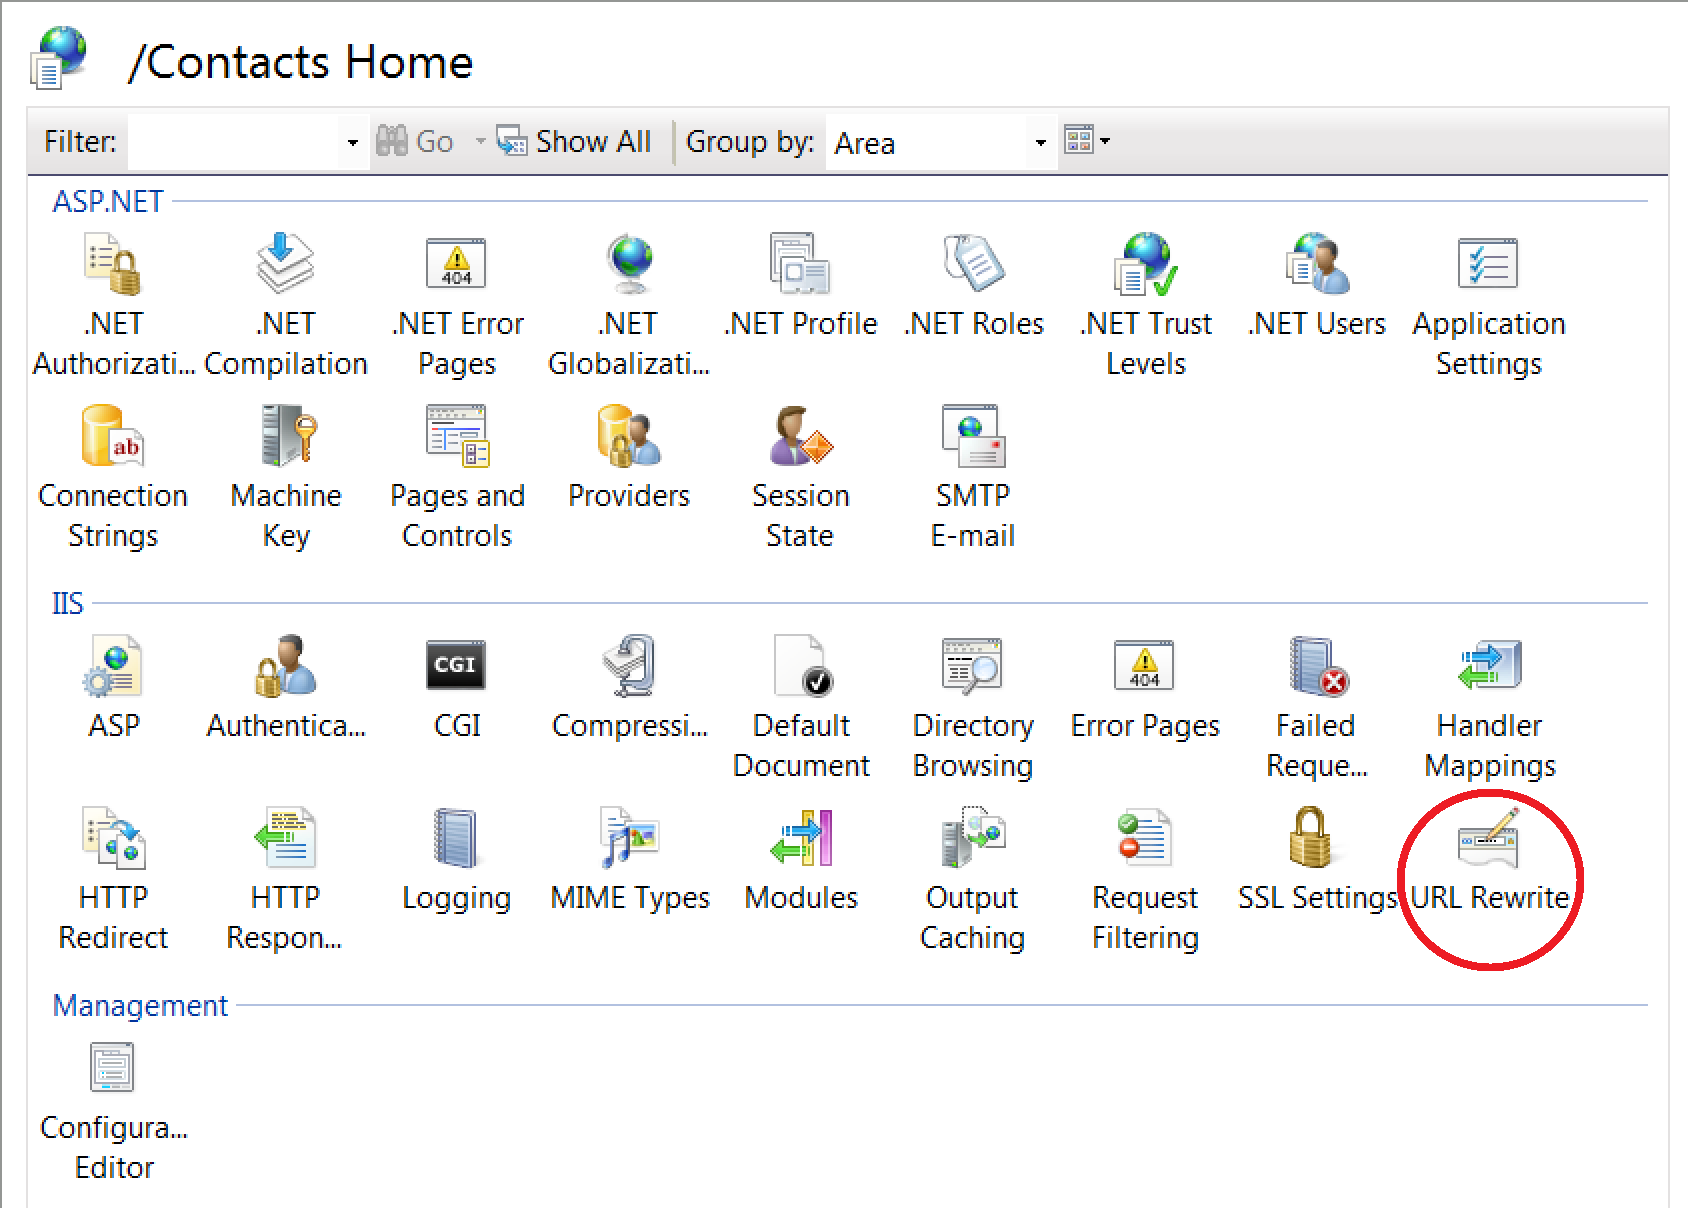
Next we need to present a “RESTful” looking interface to the world, not something involving calling filenames with extensions. For that we are going to need the IIS URL Rewrite module. This is not always installed in IIS 7 by default, so for 64-bit Windows 7 you can download and install it from: https://www.microsoft.com/en-gb/download/details.aspx?id=7435. For Windows 10 use https://www.iis.net/downloads/microsoft/url-rewrite, but be aware that uses the Windows Platform Installer to accomplish this.
Once that is installed, open Internet Information Service (IIS) Manager and go to your application’s virtual directory; you will find the URL Rewrite feature in the Features View (bottom tabs) in the IIS section:
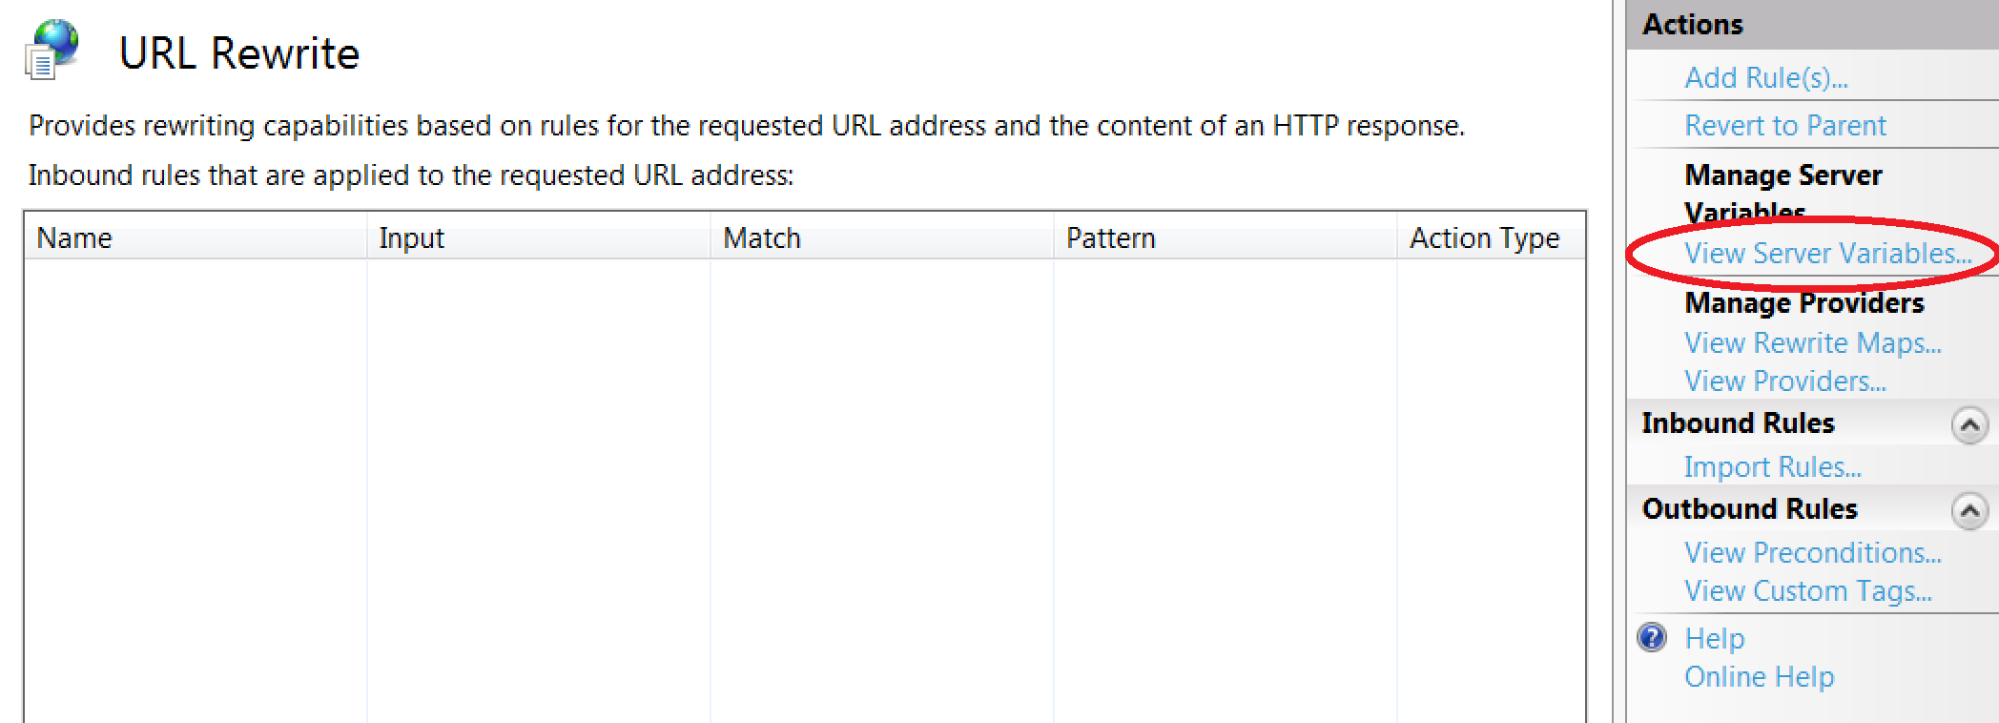
URL Rewrite has a formidable reputation, but be not afraid, we are going to tame it by forcing it into simplicity! Open it to get started.
The first thing we need to do is to add a custom server variable to IIS’s standard set to hold the original request to our service. Click the “View Server Variables” link in the right-hand pane:
Then click the “Add…” link in the right-hand pane and in the dialog box enter ORIGINAL_REQUEST and click OK. Note: the naming of this needs to be exactly as stated; the cRESTfulService class we are going to use needs it and expects it to be just that.
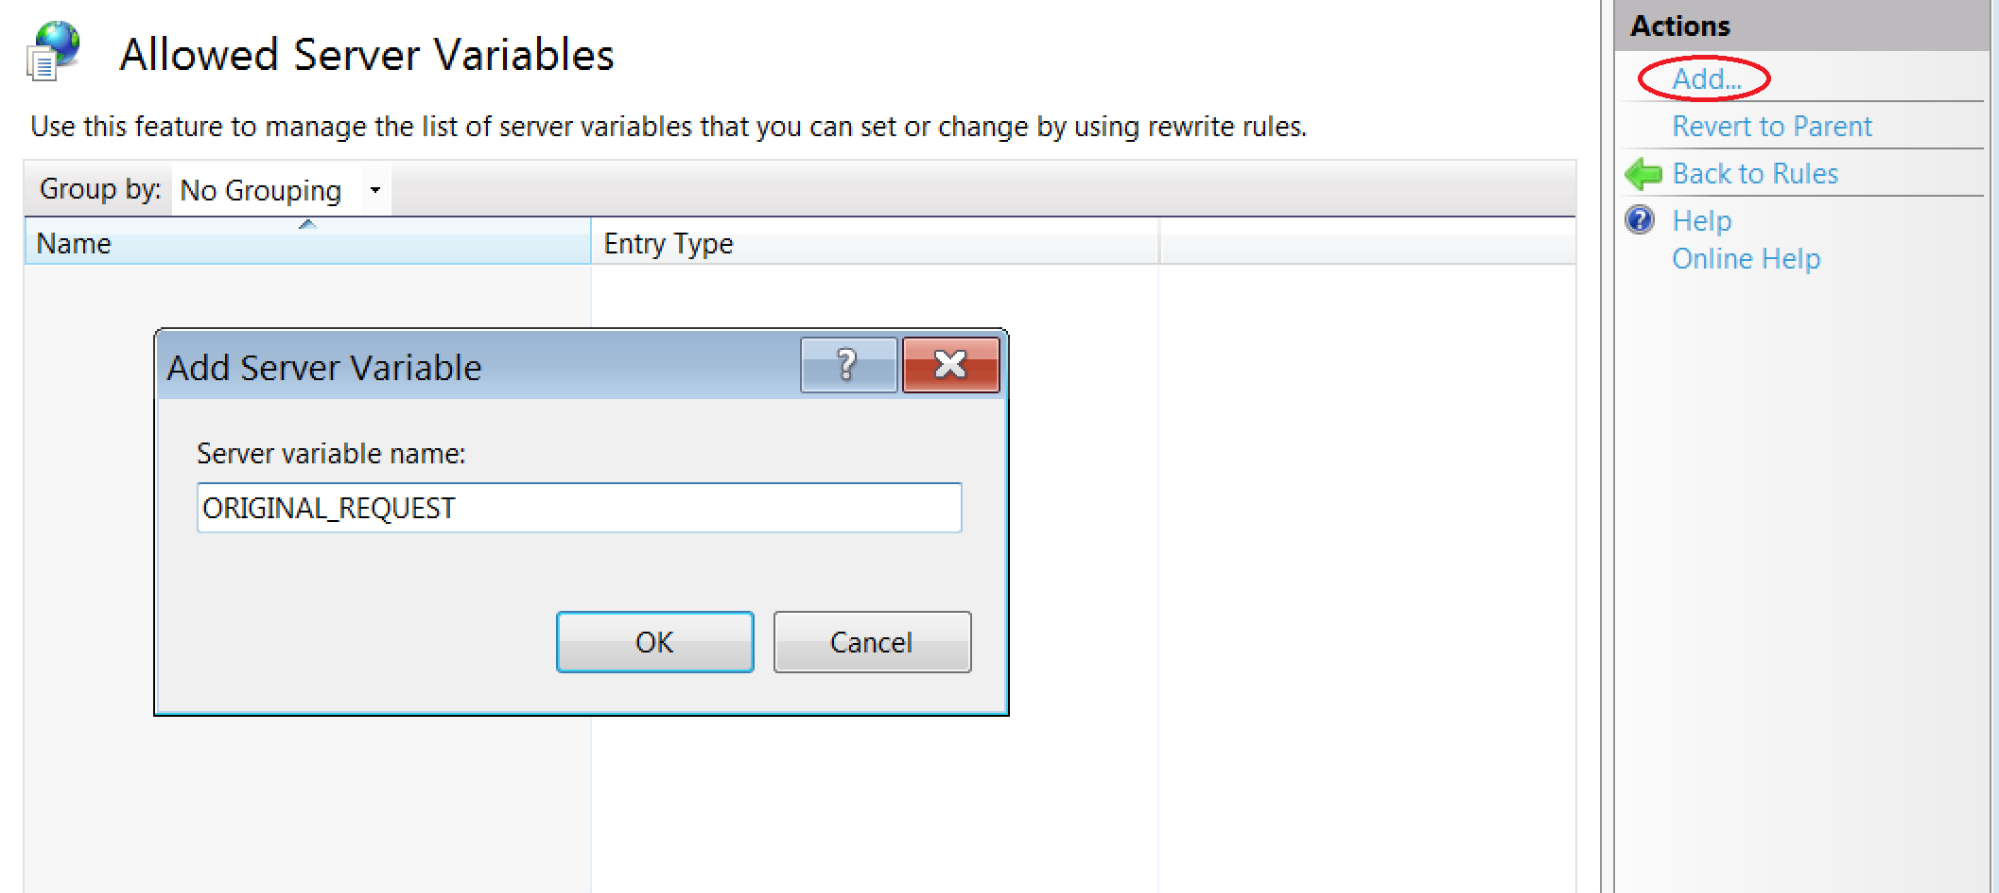
It should then appear in the list in the main pane as type “Local”.
Click on the “Back to Rules” link in the right-hand pane.
Click on the “Add Rule(s)…” link at the top of the right-hand pane. In the resulting Add Rule(s) dialog select the first option – Blank rule – and click OK.

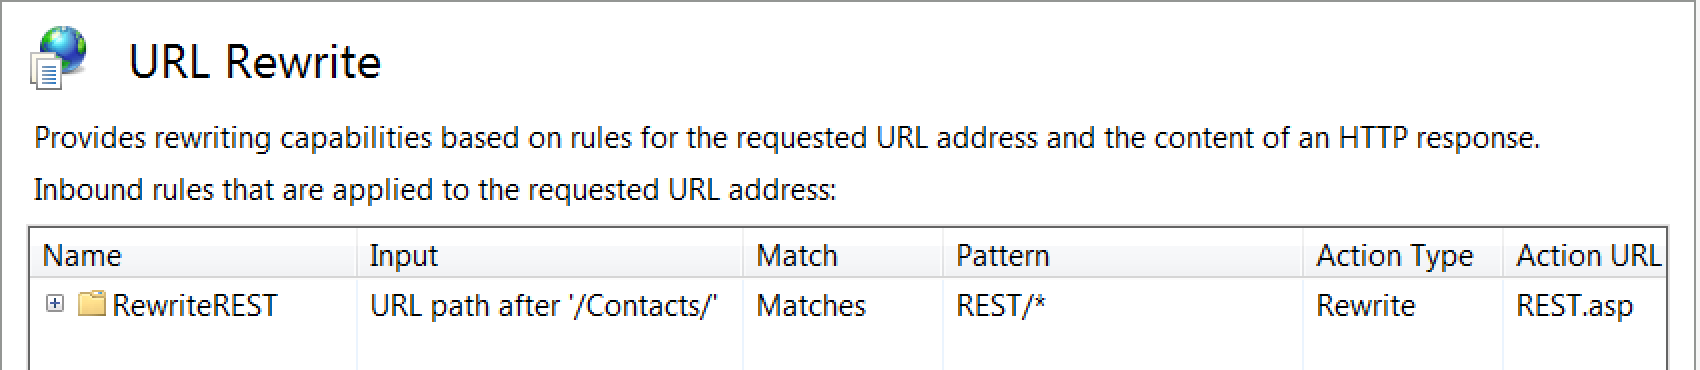
In the Edit Inbound Rule dialog, give the rule a name – say “RewriteREST”. Leave the Requested URL combo as Matches the Pattern, but change the Using one to Wildcards (you could use regular expressions, but personally I hate them – I don’t care how powerful people tell me they are!).
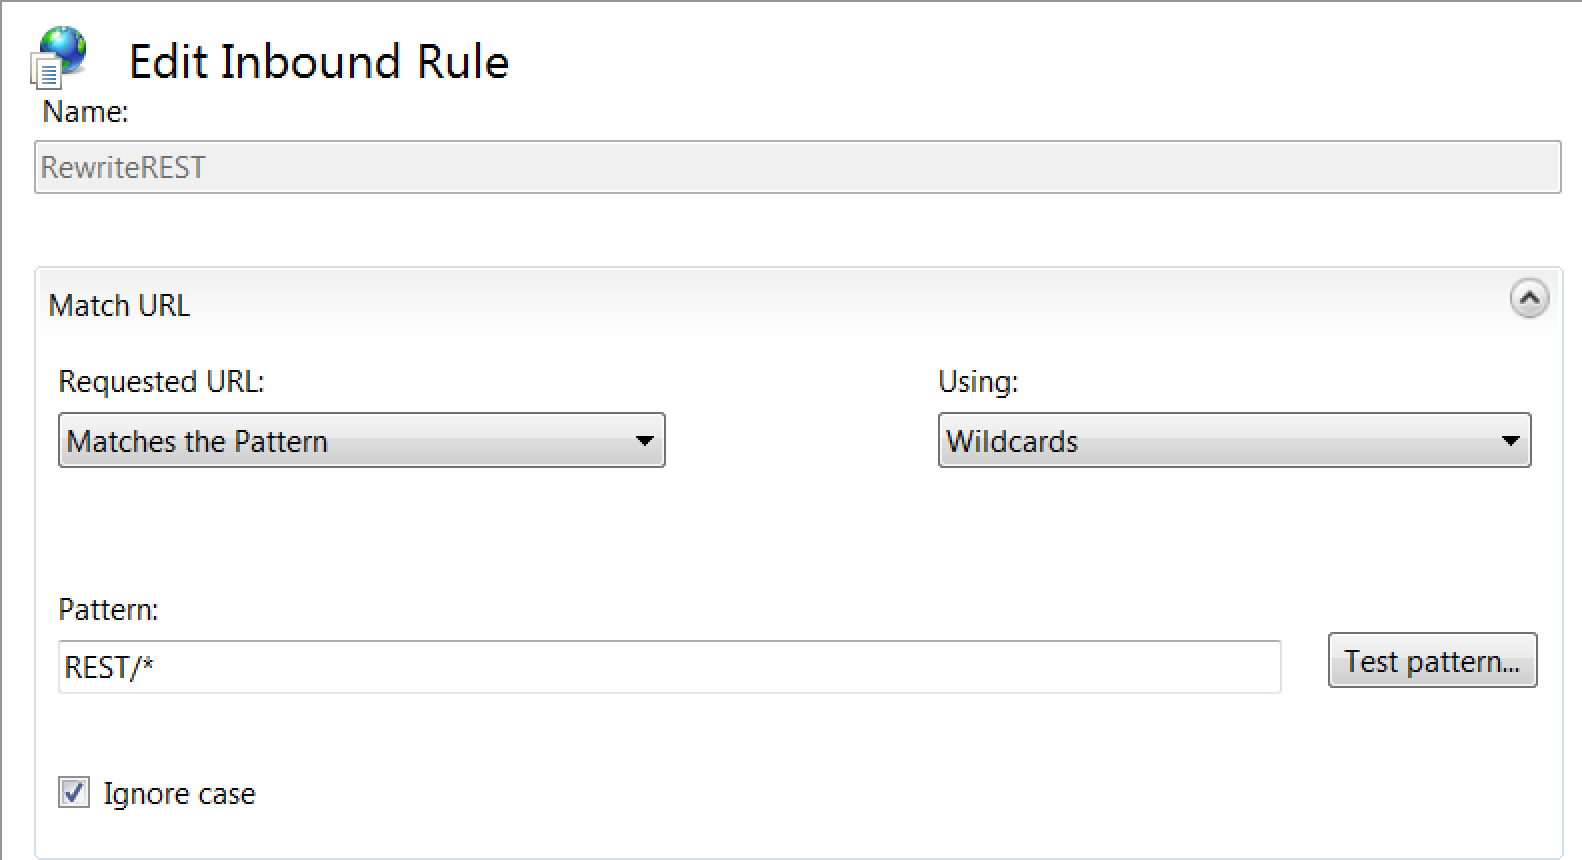
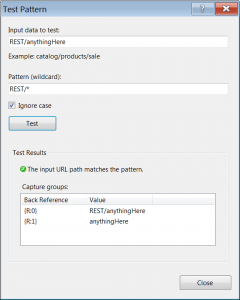
In the Pattern box simply enter: REST/*, then click the Test pattern… button. Enter “REST/” followed by anything you like in the Input data to test box and click the Testbutton: you should find that the pattern matches (no surprise: * matches anything), while below a couple of Capture Groups should be displayed. Take note of the second of these – {R:1} – we will be using it shortly. Then click Close.
Back in the Edit Inbound Rule dialog expand the Server Variables section and click its Add button.
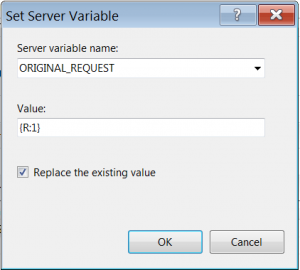
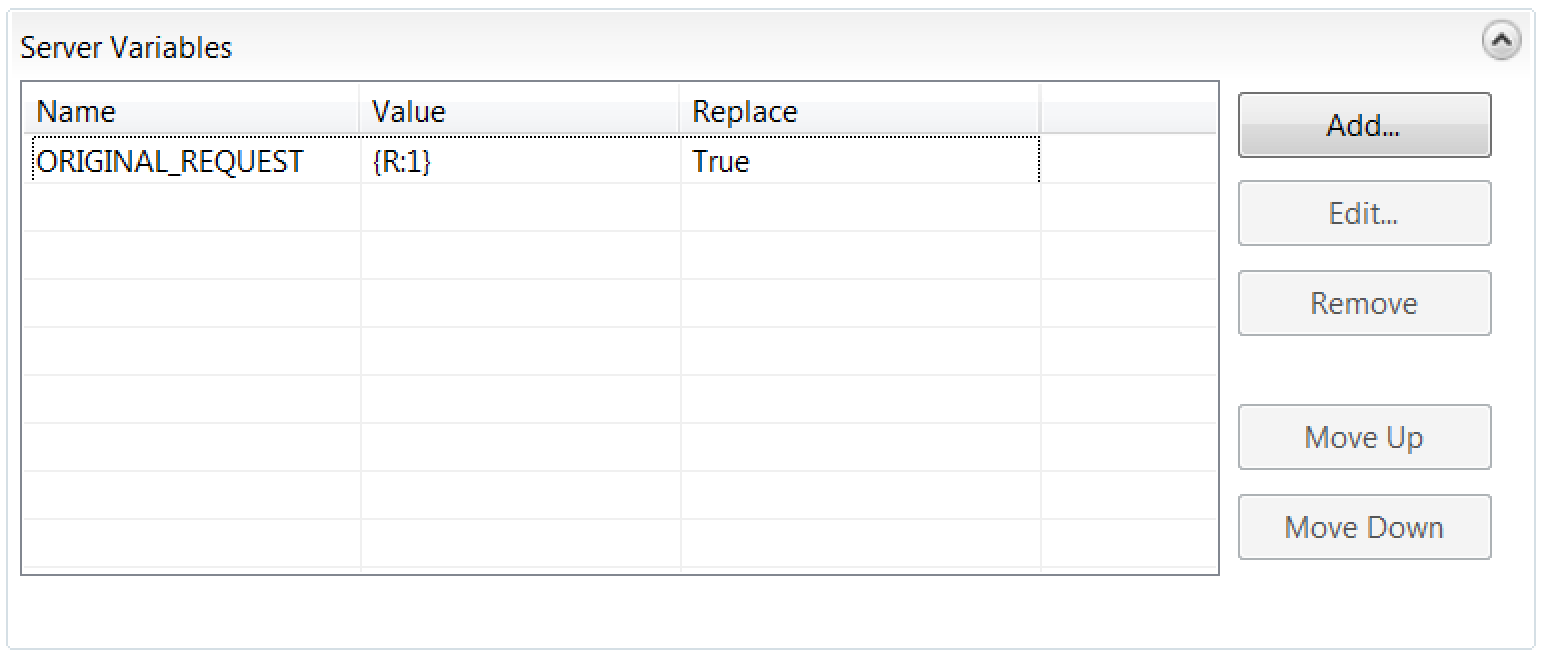
Select our new “ORIGINAL_REQUEST” from the Server variable name combo and in the Value box enter that “{R:1}” (unquoted – and remember that those are curlybraces) we noted in our test. Leave the Replace the existing value box checked. Click OK. We should see our setting appear in the list:
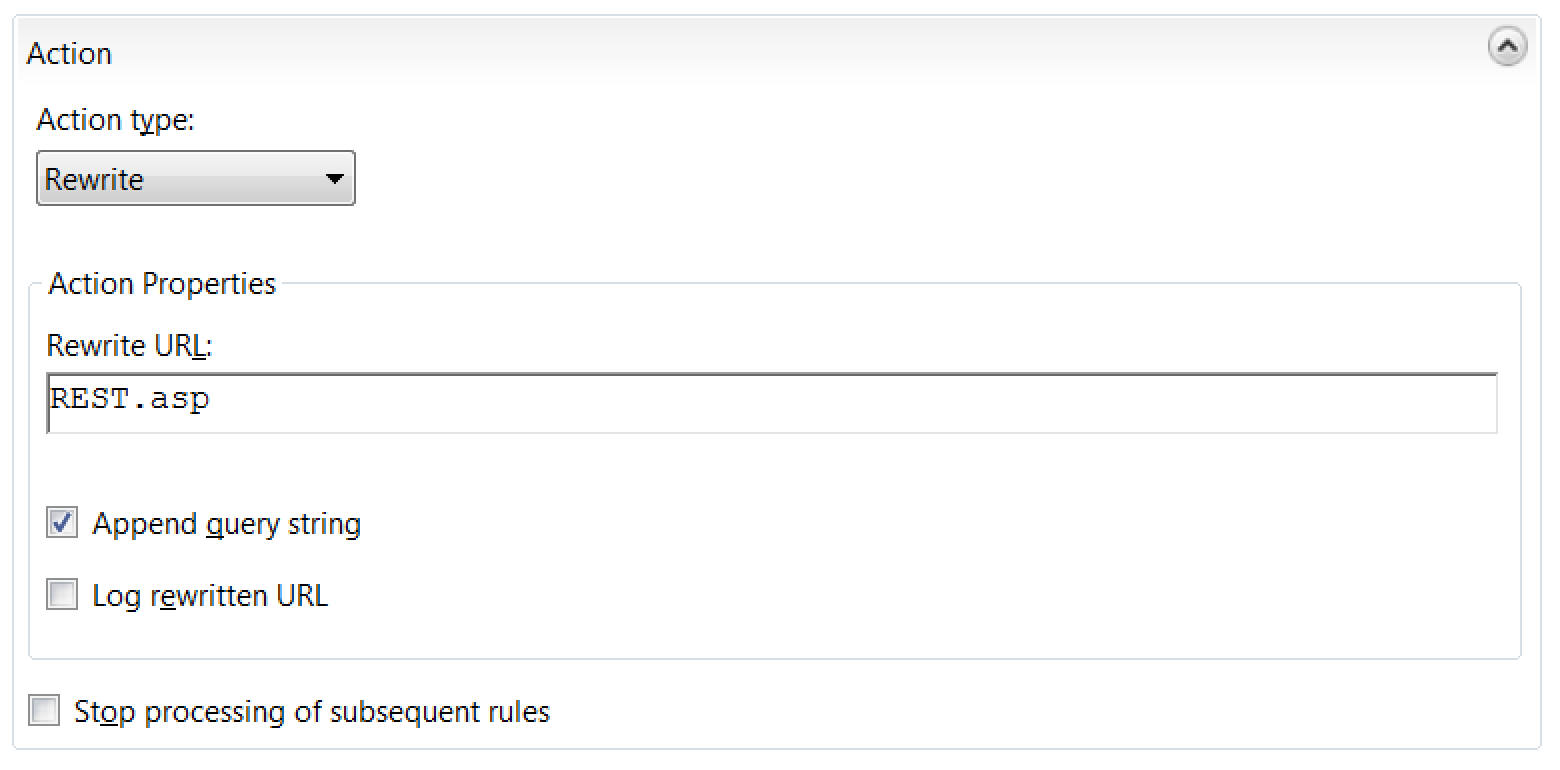
Back in the Edit Inbound Rule dialog in the Action section, leave the Action type as Rewrite, then enter the name of your ASP file in the Rewrite URL box (I called mine REST.asp). Leave the Append query string box checked.
Click the “Apply” link at the top of the right-hand pane.
Back in the URL Rewrite pane we should now see our rule:
Handling the HTTP Verbs
Finally we need to ensure that all the HTTP verbs we need are going to be properly handled, not just the usual GET and POST.
To do this we need to open the Handler Mappings feature in the IIS section of our virtual directory:
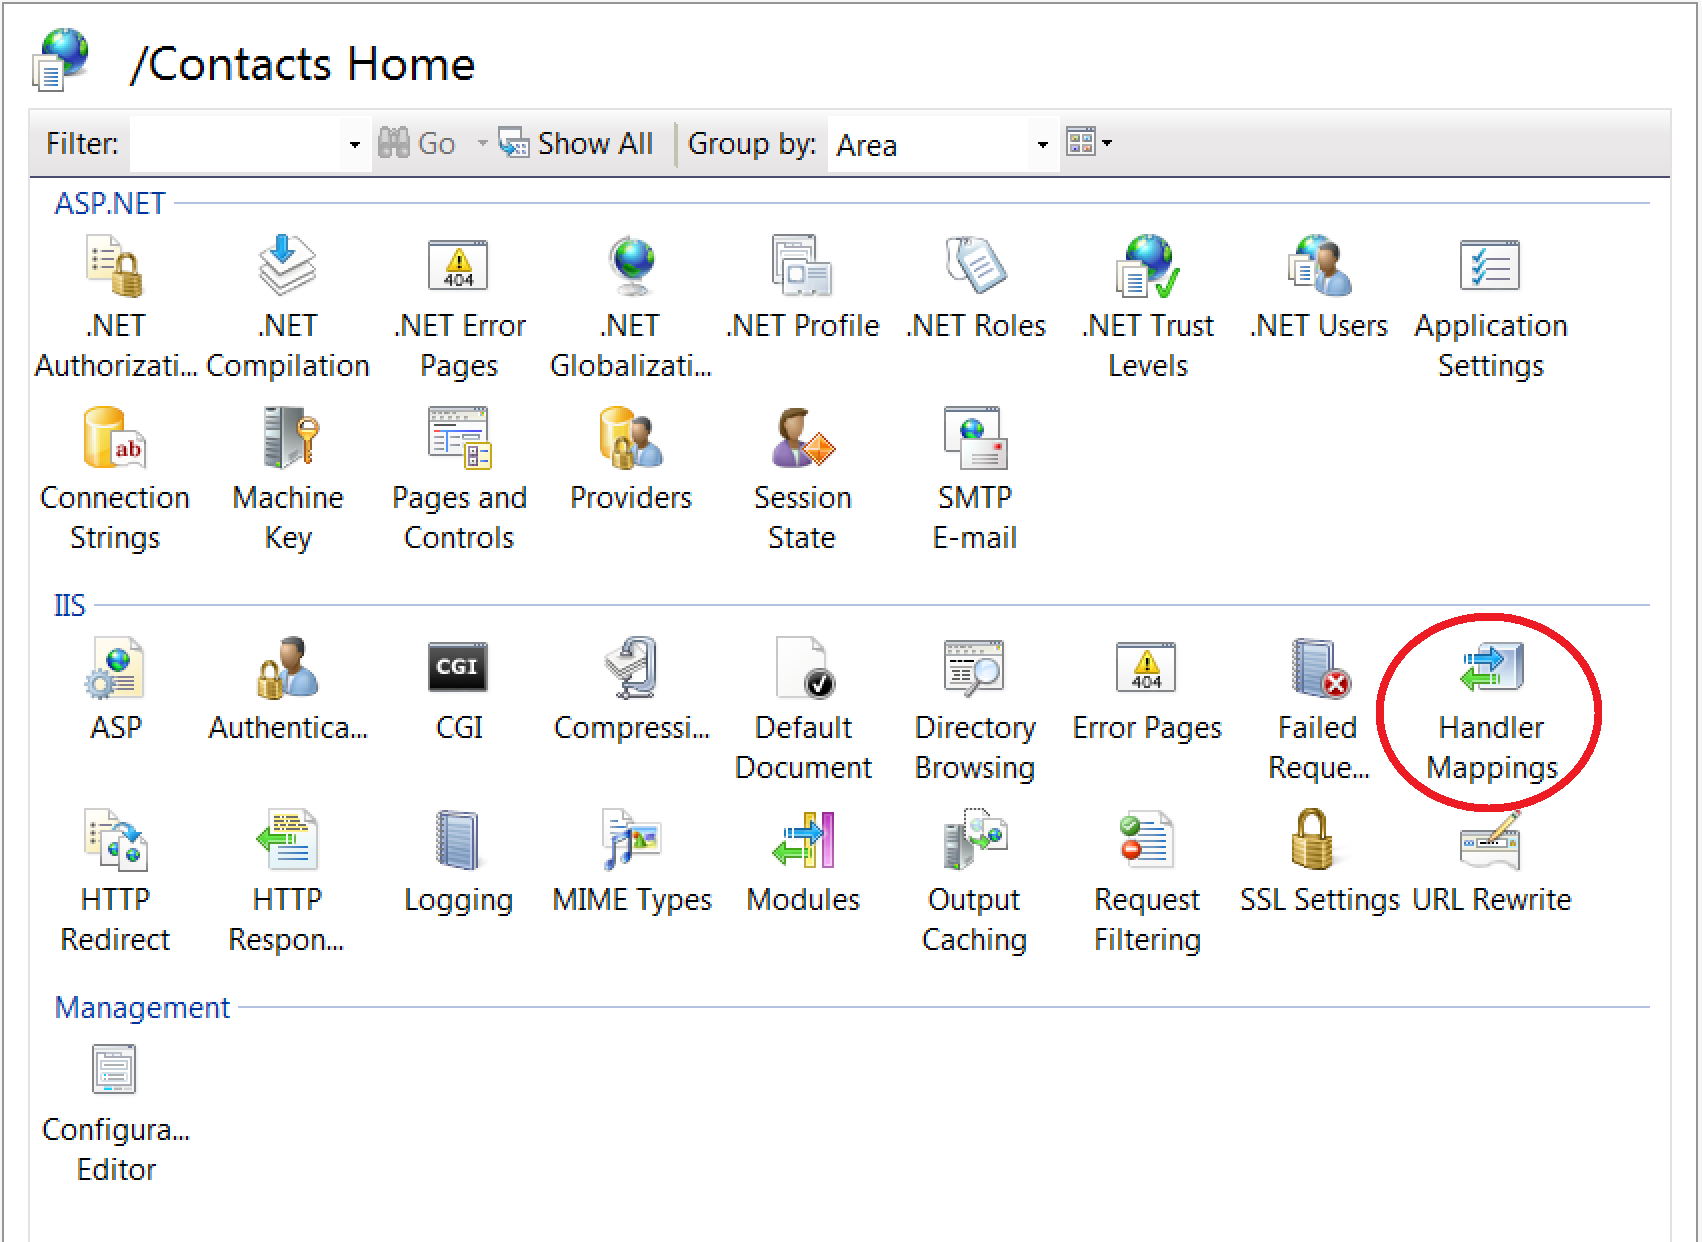
Find and select the ASPClassic handler and double-click it:

Then click on the Request Restrictions button in the dialog, then select the Verbs tab in the next. In the One of the following verbs box, to the default “GET,HEAD,POST” add “,PUT,PATCH,DELETE” (Note: no spaces – this matters) then click OK, OK and Yes:
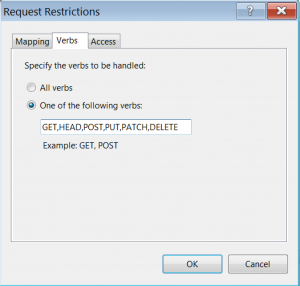
In fact you could just choose the “All verbs” option for simplicity.
Now we are done fiddling with IIS.
Summary of IIS changes
So what we have done in IIS Manager is redirect all calls to “/Contacts/REST/…” to our REST.asp file, while storing the original request in the “ORIGINAL_REQUEST” server variable.
The ASP file will, via spooky undocumented methods of the cWebBusinessProcess class, extract the HTTP body of the request (if present) and pass it, along with its length, to the ProcessCall method of our object (inherited from the cRESTfulService class), which will extract any JSON in that body to a JSON object and store its object handle in a property.
We have also ensured that we can employ the full standard set of REST verbs: GET, POST, PUT, PATCH and DELETE.
Now we just need to know how to use that.
Filling out our object
There are only really four methods and two properties of the cRESTfulService class you initially need to know about (full documentation is here):
- The RouteCall function – you must provide this in your object, overriding the method in the class (which always returns an error if not overridden)
- The ReturnJson function – all your business functions (the ones dealing with calls to your service) must ultimately return a call to this (although possibly via ReturnError below)
- The ReturnError function – this takes three arguments: an integer error code, a string error message and a string extended description (just pass an empty string if the message itself is sufficient for clarity); the function will place these in an error struct which ReturnJson will then be called with
- The RequestPart function – this takes a zero-based integer argument and returns the appropriate segment of the original request (it assumes that these will be separated by “/” characters), so if your service was called “OrderService” and the original request was for “…/OrderService/Order/143289/OrderItem/5”:
- Get RequestPart 0 would return “Order”
- Get RequestPart 1 would return “143289”
- Get RequestPart 2 would return “OrderItem”
- Get RequestPart 3 would return “5”
- The phoJsonData property will, if valid JSON data has been passed in the HTTP body, contain the handle of a JSON object holding that data
- The psVerb property – this contains the HTTP verb the request was made with
Defining the service operations
Our contacts sample is going to be simple. It will have only one data dictionary and five business methods:
- ContactList
- ContactDetail
- CreateContact
- UpdateContact
- DeleteContact
I am not going to detail here what code should go into each of these (you should mostly be able to work that out for yourself, but in any case they are there in full in the sample zip), but in outline they will look like this:
Object oContacts_DD is a cContactsDataDictionary
End_Object
Set Main_DD to oContacts_DD
Function ContactList Returns Variant
tContactList tConts
…
Function_Return (ReturnJson(Self, tConts))
End_Function
Function ContactDetail Returns Variant
End_Function
Function CreateContact Returns Variant
End_Function
Function UpdateContact Returns Variant
End_Function
Function DeleteContact Returns Variant
End_Function
Note that each has a return type of “Variant” – this should always be the case. You can see how this works in the ContactList example above, with the Function_Return line returning a call to ReturnJson, passing a struct argument. (Technically a struct is not absolutely required – a simple data-type such as a string might be returned instead – but then your response to the call would not really be JSON.)
It turns out that this simple application only requires three struct data-types: one representing the full details of a contact, one representing the short detail to be used in the contact list and finally one for the list itself, which simply contains an array of those short contact details.
Most important is the RouteCall function, which as noted above must be provided. In our example it will look like this:
Function RouteCall Returns Variant
String sVerb sReq
tErrorResponse tErr
Send Rebuild_Constraints of oContacts_DD
Get psVerb to sVerb
Get RequestPart 0 to sReq
Case Begin
Case ((sVerb = “GET”) and (sReq = “CONTACTLIST”))
Function_Return (ContactList(Self))
Case Break
Case ((sVerb = “GET”) and (sReq = “CONTACT”))
Function_Return (ContactDetail(Self))
Case Break
Case ((sVerb = “DELETE”) and (sReq = “CONTACT”))
Function_Return (DeleteContact(Self))
Case Break
Case ((sVerb = “PUT”) and (sReq = “CONTACT”))
Function_Return (CreateContact(Self))
Case Break
Case ((sVerb = “PATCH”) and (sReq = “CONTACT”))
Function_Return (UpdateContact(Self))
Case Break
Case Else
Function_Return (ReturnError(Self, ;
C_restUnrecognisedMethod, ;
“Method not found”, ;
“The method does not exist”))
Case End
End_Function
After sending Rebuild_Constraints of the Contacts Data Dictionary (which is best done here to ensure it always happens), it requests the HTTP “verb” used to make the call and the first (zeroth) element of the path (following that of the service itself).
There then follows a Case statement which checks the verb and that first part of the path to decide which business function to call, which it does with a Function_Return, so effectively passing control to that. Note: the Case Break statements are therefore redundant, since they will never be executed, but good practice says they should still be there.
Finally if the combination of verb and URL have failed to match any of what it was expecting, it returns an error using the ReturnError function (which in turn will call ReturnJson with an error struct).
Ours is a simple example, so only the first part of the path is being checked, but in more complex situations many parts of that might be examined. (Note that the returned path segments will always be in uppercase to make such comparisons less error prone.)
Any business function which requires access to the HTTP request body can get it using the line:
Get JsonToDataType of (phoJsonData(Self)) to tVar
Where tVar is a struct variable of the appropriate type which the function can then work on like any other kind of DataFlex data.
(In the sample we have also overridden the BeforeProcessing event to do a simple check that the requesting client is authorised to access the application. This is only intended as an example of how BeforeProcessing might be used, not as an example of how to properly secure your service!)
Tidying up WebApp.src
The template webapp.src the Studio wrote for us when we created the project is one designed for a web-browser based web application and so is full of components to facilitate that (menus, command bars, etc.). If all we are using it for is our RESTful web service, a lot of that can be removed. Almost all of it in fact. Mine now looks like this:
Use AllWebAppClasses.pkg
Object oApplication is a cApplication
End_Object
Object oWebApp is a cWebApp
Use Contacts.wo
Use SessionManager.wo
End_Object
Send StartWebApp of oWebApp
(SessionManager.wo is not actually being used, but it keeps errors from happening if you are debugging and have not unchecked “Open WebApp URL in Browser when debugging” in “Tools”, “Configure Studio”.)
How it all works
All this returning of function calls and having a return type of variant may seem confusing, so let’s look at how a call progresses:
- The URL Rewrite rule we implemented ensures that all calls to our virtual directory of the form “REST/whatever” are directed to the REST.asp file with the “whatever” being stored in the ORIGINAL_REQUEST server variable
- The ASP calls the ProcessCall function of the web object (provided by the cRESTfulService class it is based on) passing it the address of the HTTP request body (if there is one) and its length in bytes
- That ProcessCall method deals with getting various things – such as the HTTP verb, the parts of the call path and the original call itself – into properties, then calls BeforeProcessing, expecting a True return value from it, before getting and parsing the HTTP body data, if present, into a JSON object whose handle is also stored in a property (phoJsonData), after which it then returns a call to RouteCall
- RouteCall in turn returns a call to the appropriate business function (or an error, if no matching method is found)
- Each of the business functions should, if no problems are encountered, return a call to ReturnJson passing the data they are returning in a struct variable (if there are problems, they should instead return a call to ReturnError, which will itself return a call to ReturnJson)
- Eventually things will end up in the ReturnJson function, which will tidy up, populate a JSON object with the data passed to it in the struct variable, then serialize that JSON data into a variant string and return it
- The entire chain of calls then returns out with that variant which ultimately ends up being returned from ProcessCall back to the ASP
- The ASP then places that data (put there by the ReturnJson function) into the HTTP response body returned from the call
Et Viola! A RESTful call has been processed from end to end.
Testing our RESTful service
Unlike a SOAP web service, where we could quickly produce a test-client for our service by creating a new Client Web Service Class and pointing to the service’s WSDL definition, we need to work out a mechanism for testing our new RESTful service.
My own preference is for writing a simple DataFlex test program with functions to exercise each of the operation via an HTTP call, but that may not be to everybody’s taste.
Testing the service using a web browser
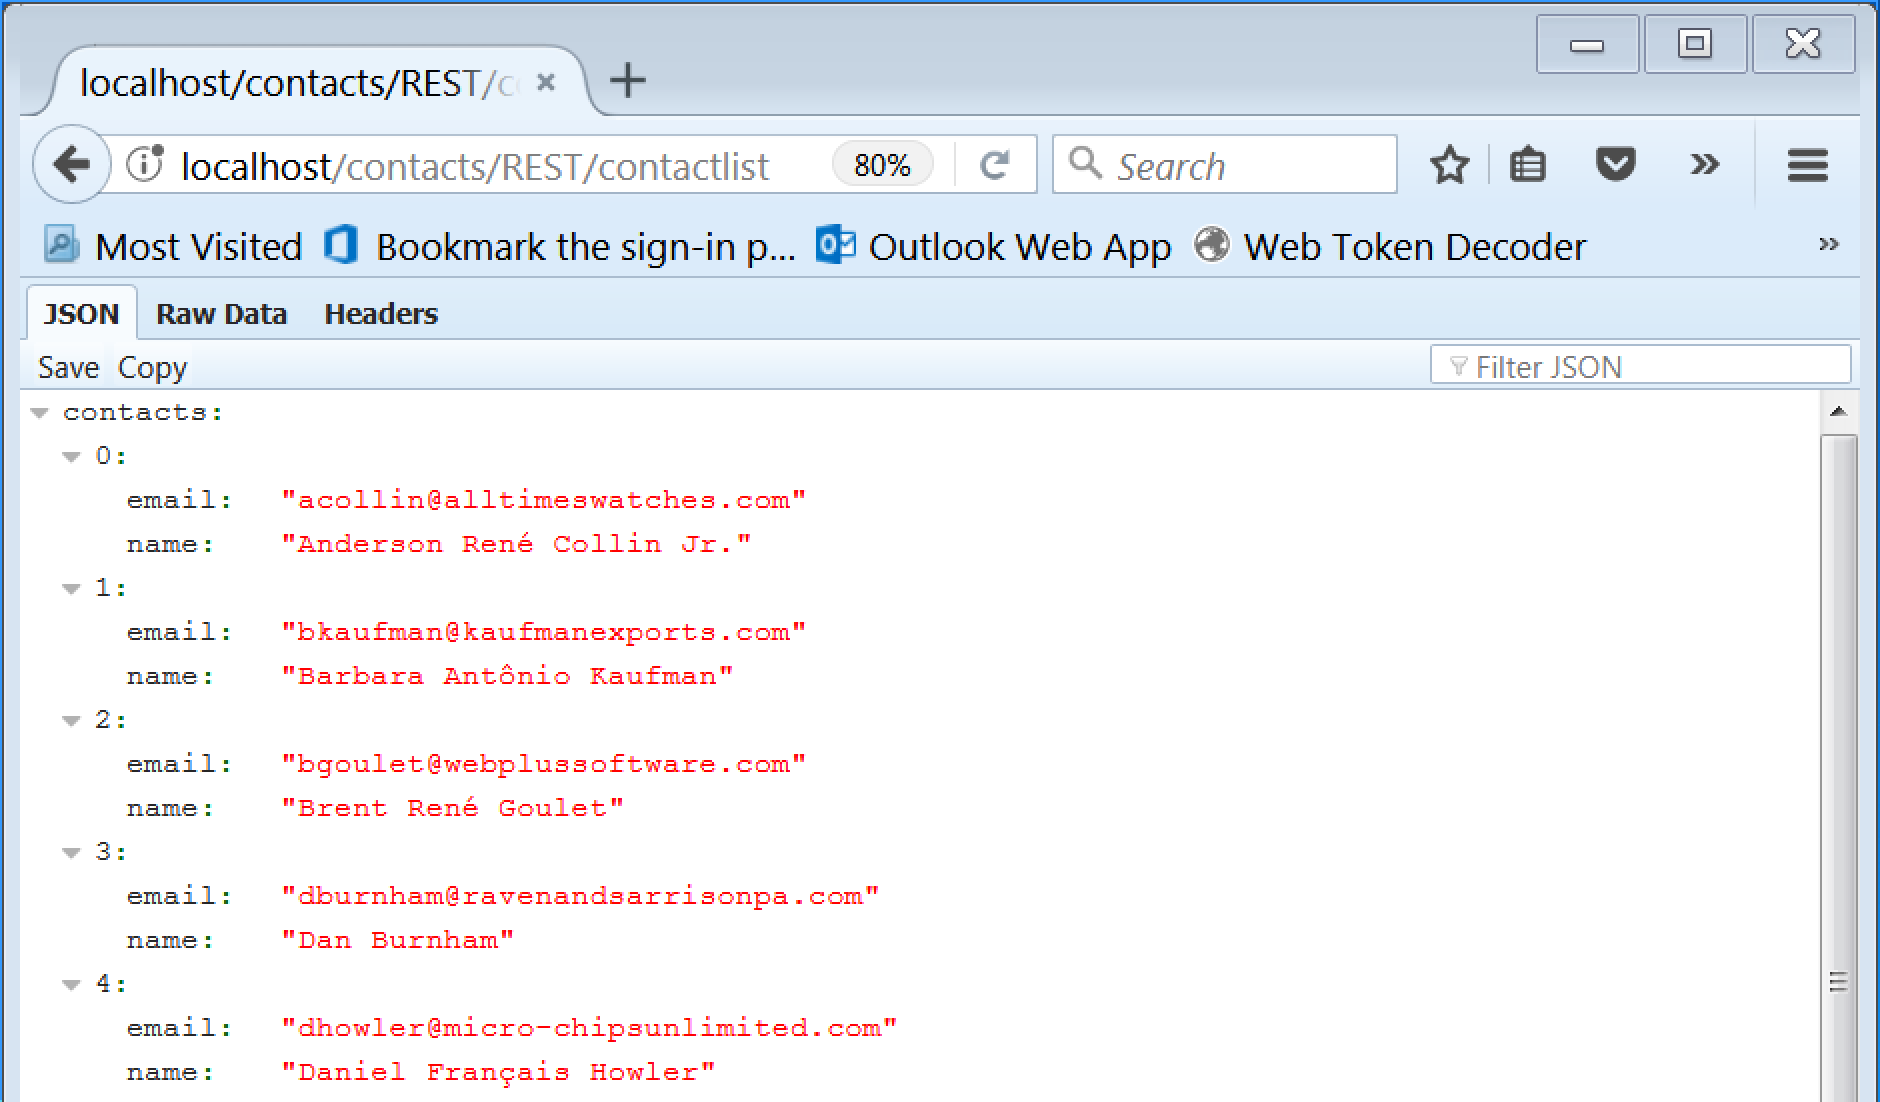
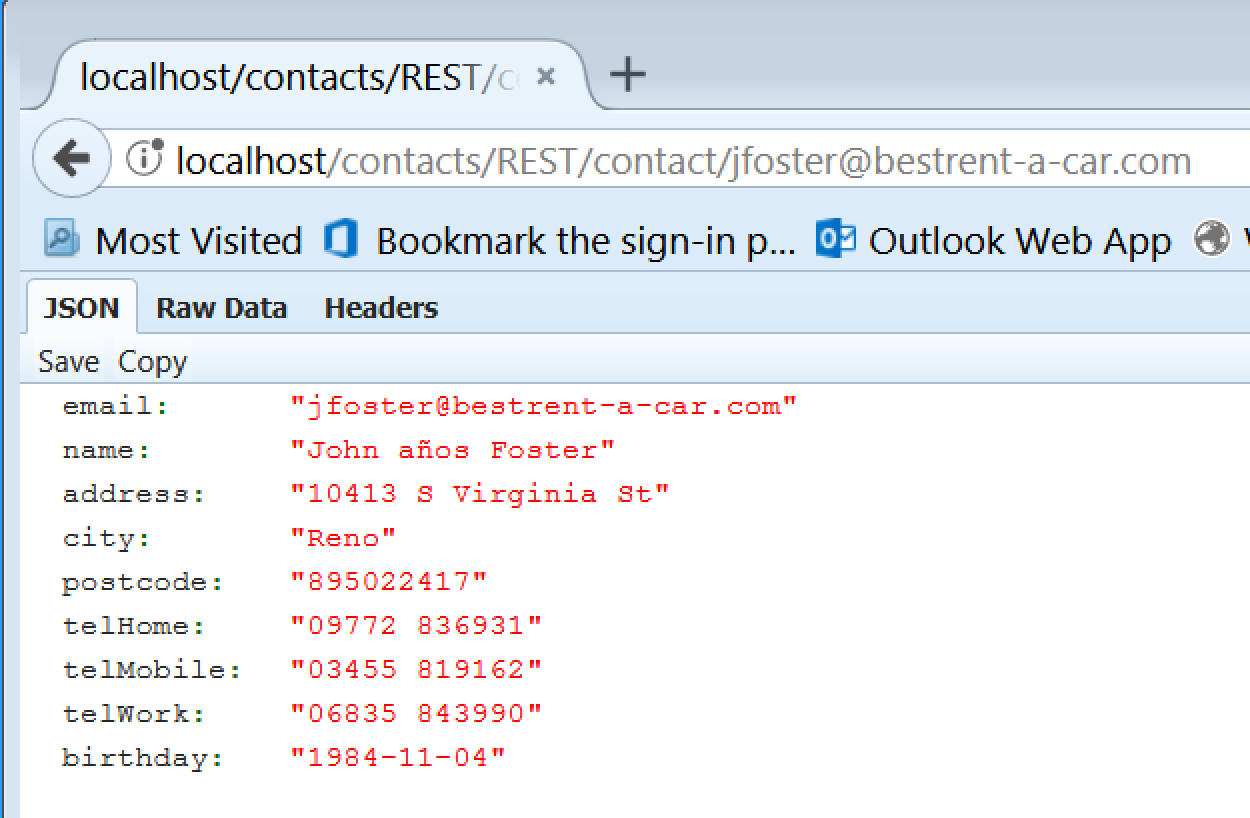
For GET methods (in our sample that will include the contacts list and the contact detail), we can simply enter the required URL in a web browser. Internet Explorer is too stupid to do a good job, although it will let us download the resulting JSON to a file for examination, but Chrome makes a reasonable fist of things:


While Firefox formats the JSON nicely:
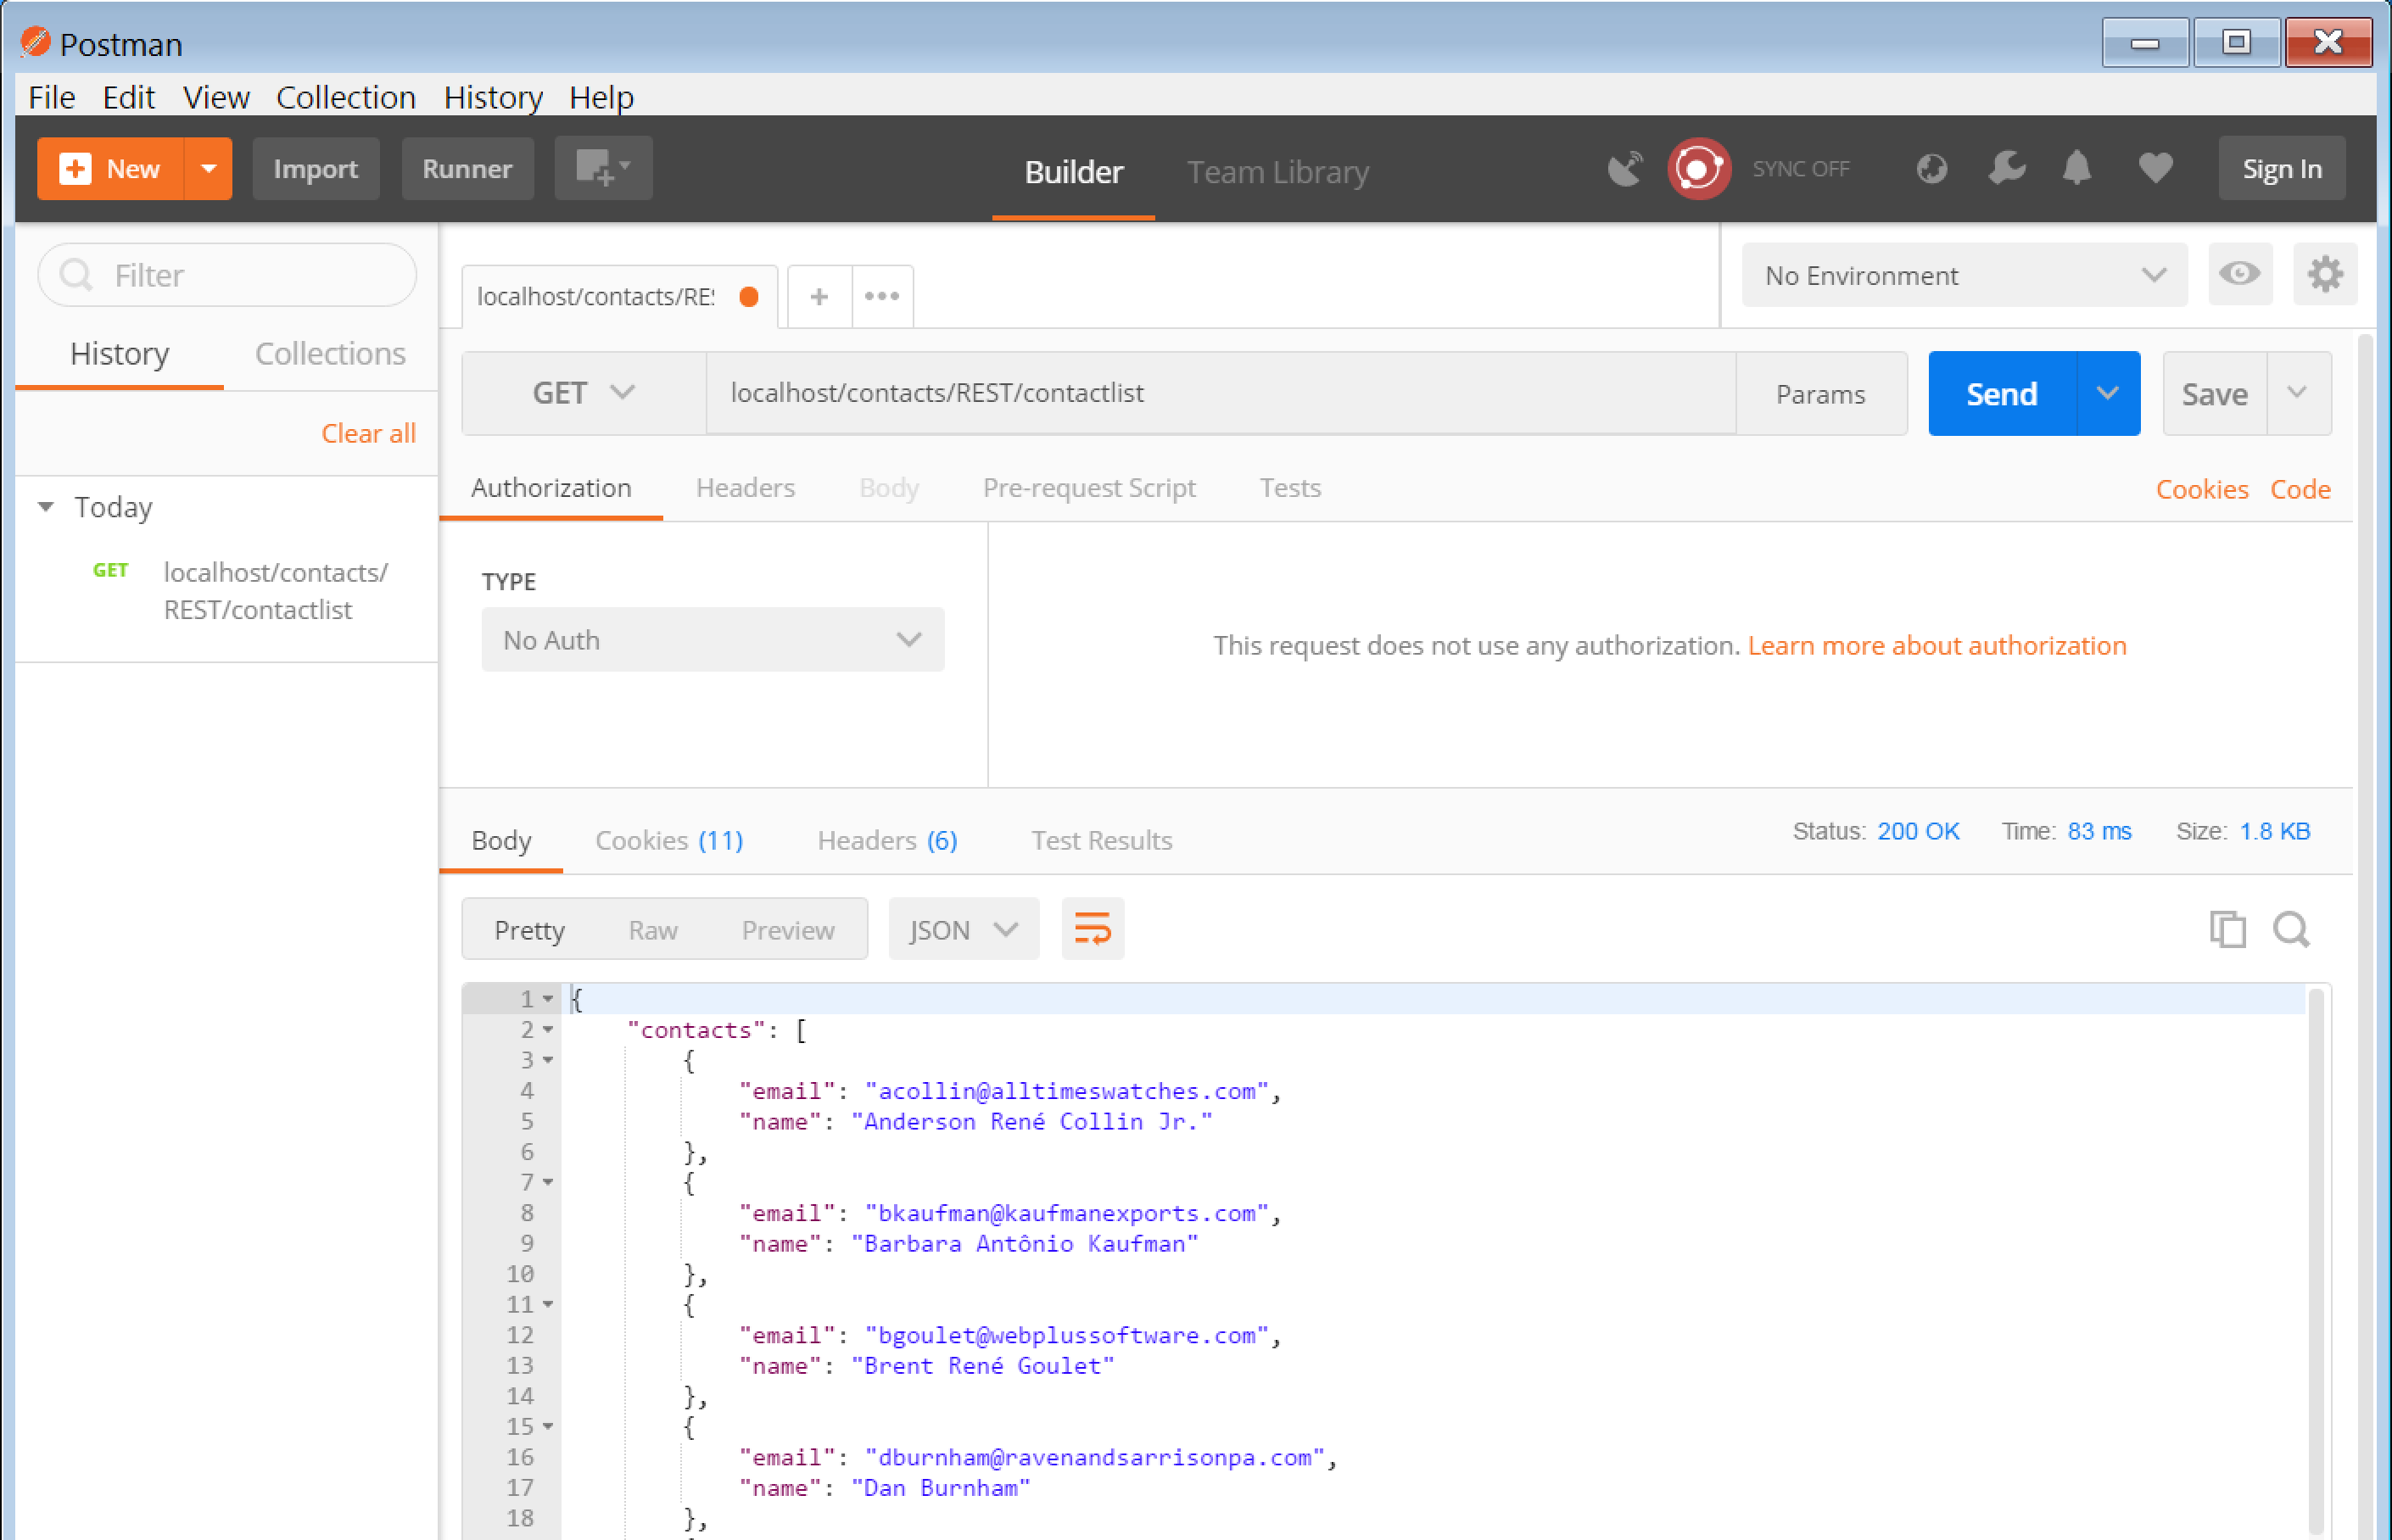
Testing the service using Postman
For testing methods that use verbs other than GET, you can download a nice little (free! ☺) utility called “Postman” from: https://www.getpostman.com/.
You can use this to test any call:
Createing a new contact (note the verb is now “PUT”, while we have selected “Body” and “raw”, then entered the required JSON by hand):
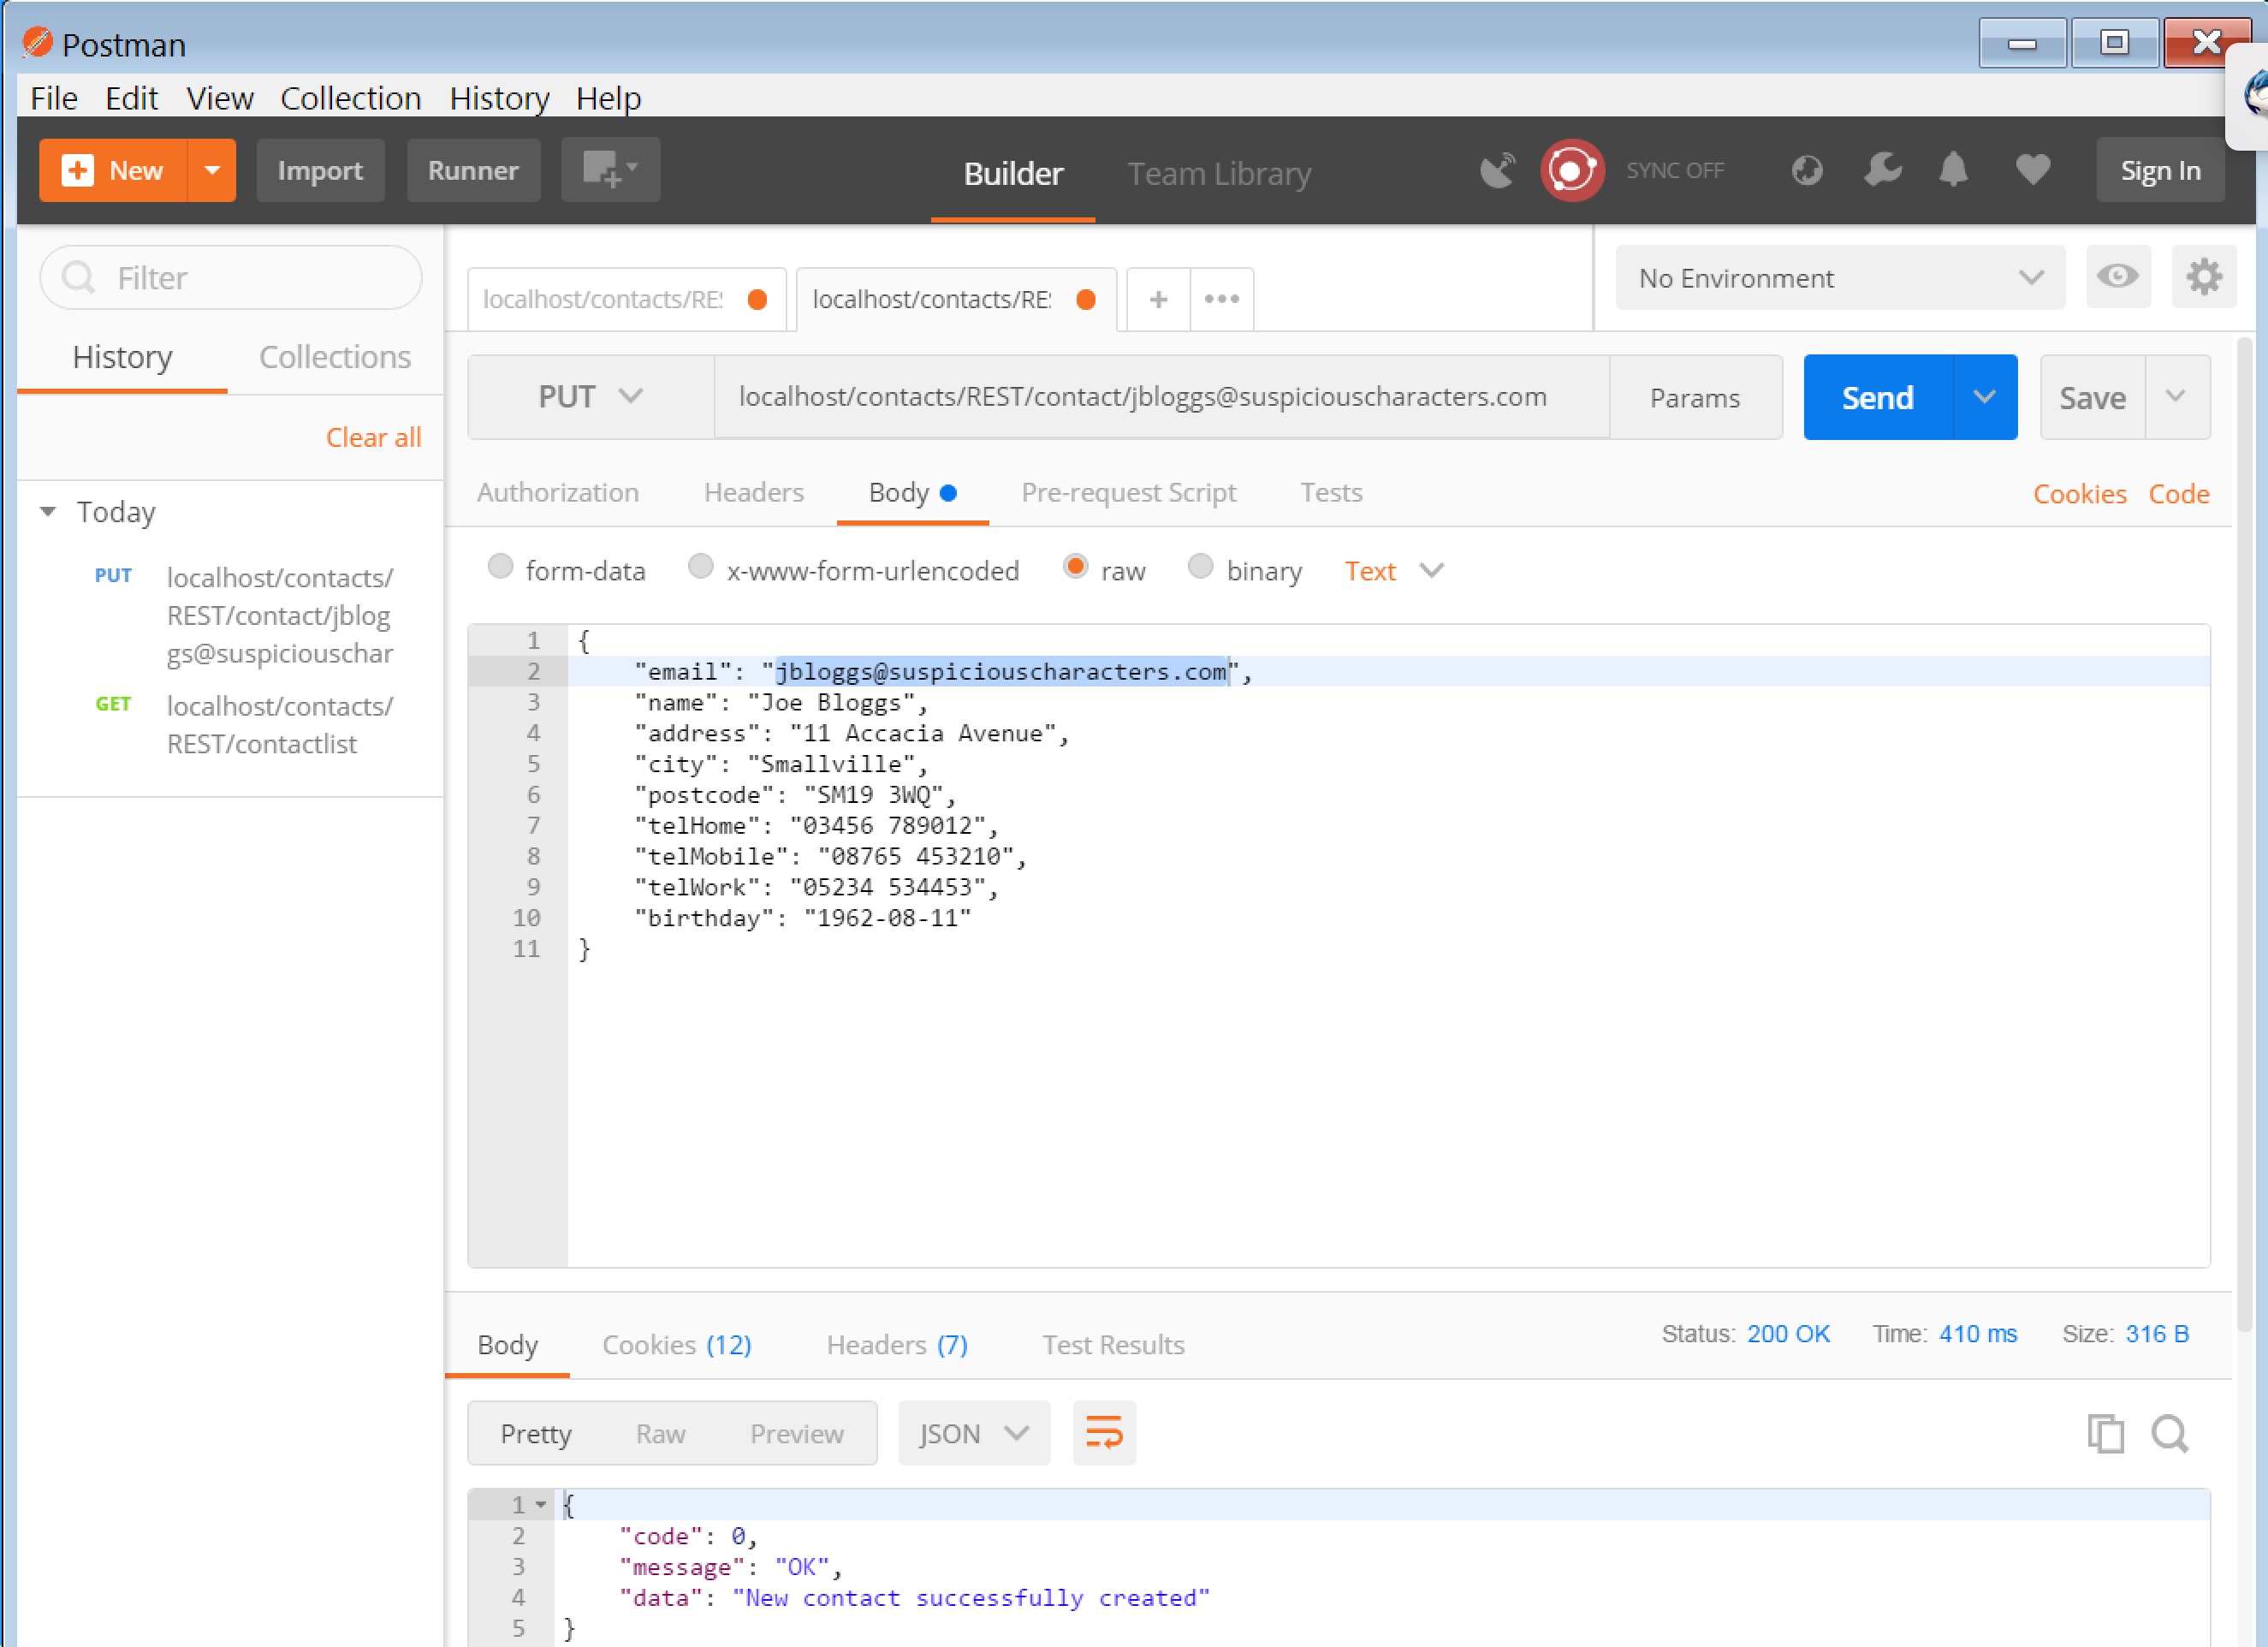
Postman keeps a history of your requests so you can go back to one to repeat it, perhaps after changing some details, or copy data from it to reduce the typing involved is setting up a new one.
You can use it for more sophisticated testing by saving requests to a collection, then stringing them together using values returned by one as input to later ones. Quite useful!
Integrating with other web apps and services
We cleared out all of the Studio-generated menus and command-bars from our stand-alone service WebApp.src for clarity and simplicity, but that doesn’t have to be the case. You can simply place your RESTful web object into a WebApp.src which contains other components such as menus, command-bars, web views, web modal dialogs and traditional XML/SOAP web service objects:
Use SessionManager.wo
Use LoginDialog.wo
Use WebResourceManager.wo
Use ContactView.wo // A web view
Use ContactsSOAP.wo // An XML/SOAP service
Use Contacts.wo // And this is our RESTful one
End_Object
The Sample
The Client
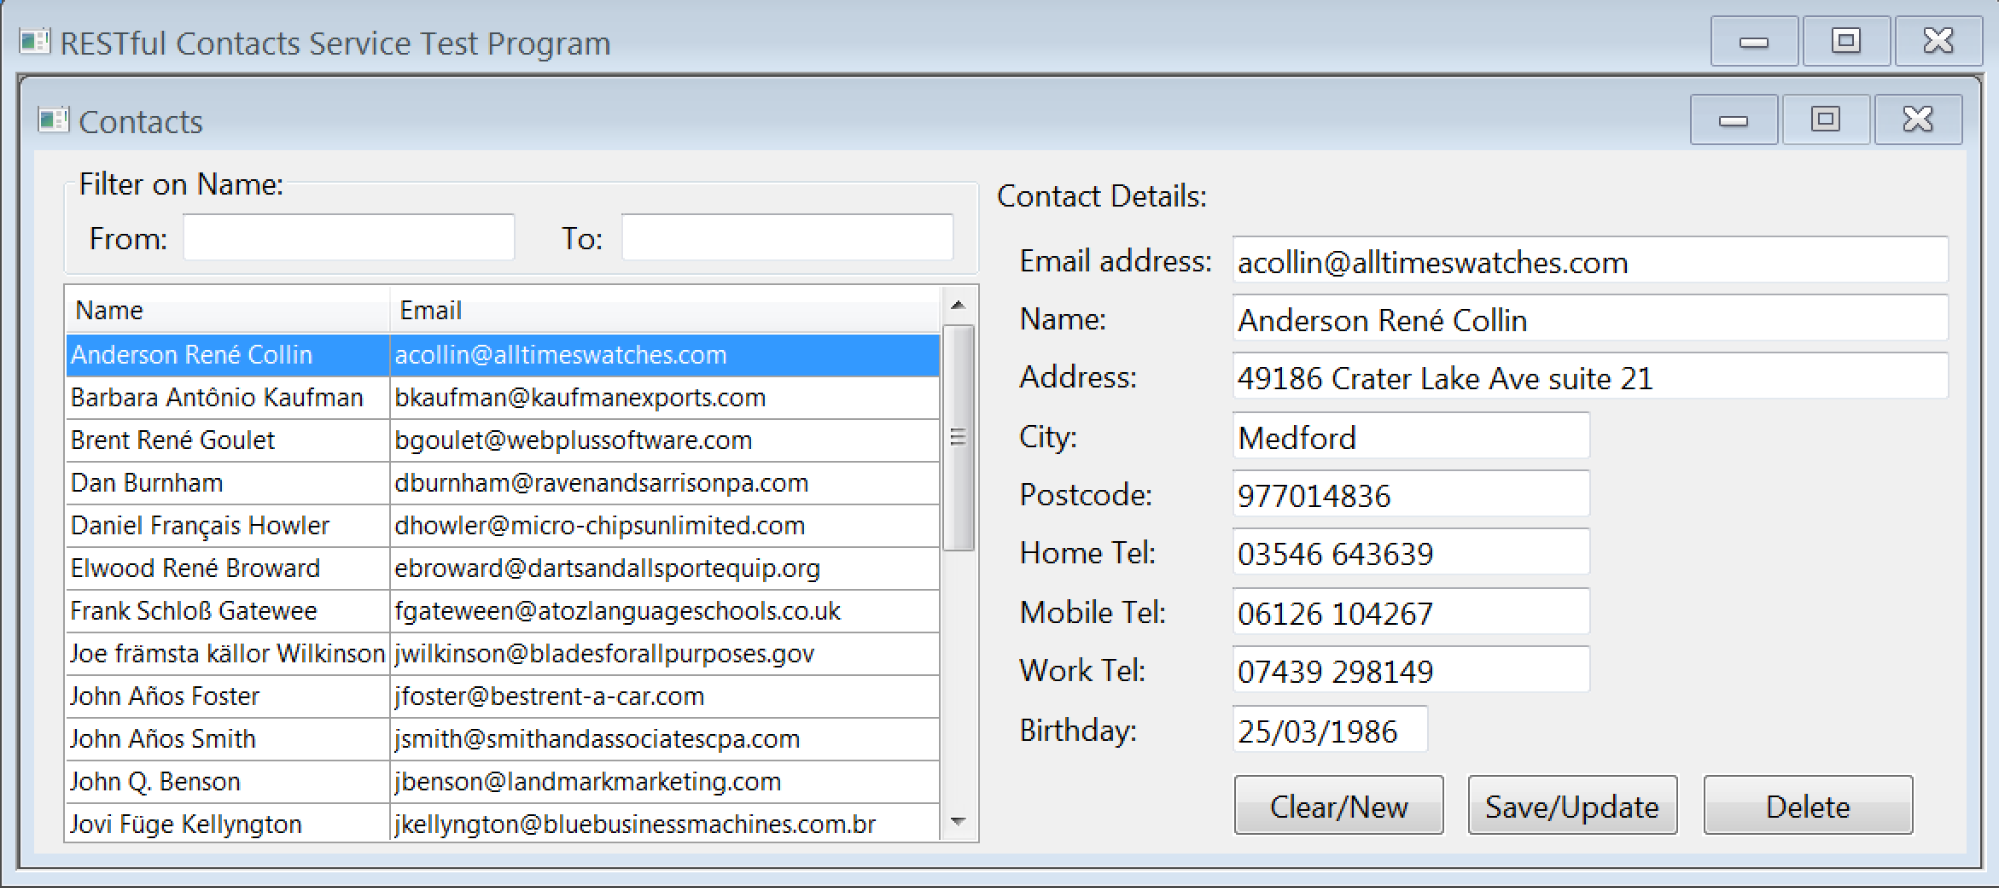
Included in the sample zip (RESTfulContactsSample.zip – ContactsClient) is a DataFlex Windows view for working with the service.
It automatically calls the ContactList (a “GET” of “ContactList”) method to fill a list of contacts, then calls the ContactDetail (a “GET” of “Contact/emailaddress”) method as each item in that list is navigated to. It has buttons for creating (actually just clearing: enter the new contact’s data then click “Save/Update”), updating and deleting contacts, as well as a filter “to” and “from” on the contact name for constraining the list, which get passed on the query string of the ContactList call (this is the reason that Rebuild_Constraints is sent to the Contacts data dictionary in the RouteCall function: by then the query string parameters will have been loaded so that the DD can make use of them).
To use it, first create a new workspace in the DataFlex 19.0 Studio, then from the sample zip copy the two files in ContactsClient → AppSrc: RESTTester.src and Tester.vw into the AppSrc directory of your new workspace. From the Studio menu select Project → Add Project, then select RestTester.src. Compile and run (F5). You should see the following:
By default this is connecting to a version of the RESTful Contacts web service hosted on our web site: www.unicorninterglobal.com. (You will see a lot of silly looking names in there; that is because I have been using it to test the handling of special language characters… thanks for the heads-up and the help Marco! Apologies to Data Access for stealing – and then mangling – the data from their Contacts sample.)
As mentioned above, that service has one additional wrinkle: it requires an “Authorization” HTTP header on each request containing credentials to allow access to the service. This is an example of how you might use the “BeforeProcessing” function in a service (it is not proper security however – that is a can of worms we will not go into here). The sample client is set up to provide that header with each request.
You can amend the sample Tester.vw to test your own RESTful web service. At the top of the view the constants C_remoteHost and C_callPath (as well as C_authCred) are defined. You can change these to point the client at your own version of the service (comment-out the existing ones and add your own versions).
The Service
As well as a client, the sample zip also contains what you need to set up the same service on your own machine (in the ContactsRESTService folder).
To do this, in the DataFlex Studio (“Run as Administrator”), create a new workspace, then copy the files from the zip’s ContactsRESTService folder into the appropriate directories of your new workspace, overwriting in the case of any conflicts. From the Studio menu select Project → Add Project, then select the WebApp.src file. Then from the Studio Menu select Tools → Register WebApp and most probably simply accept the defaults. Then compile the application (F8). (Not F5 for compile and run; firstly we are not finished yet and secondly because we have added that bit of authorization checking to the application we would only get an error response in the browser.)
Finally you need to follow the steps described above for setting up the virtual directory in IIS: creating the ORIGINAL_REQUEST local server variable, setting up the inbound rule to direct all requests to your REST.asp file and finally setting up ASP to accept the full range of verbs required for a RESTful web service. (The actual sample uses GET – twice – PUT, PATCH and DELETE – there were simply not enough operations to use POST as well!)
At this point you should be able to amend the client program to point at your own version of the service and be good to go!